Well, this is the new one. check it out, guys :)
Effortless Imaging

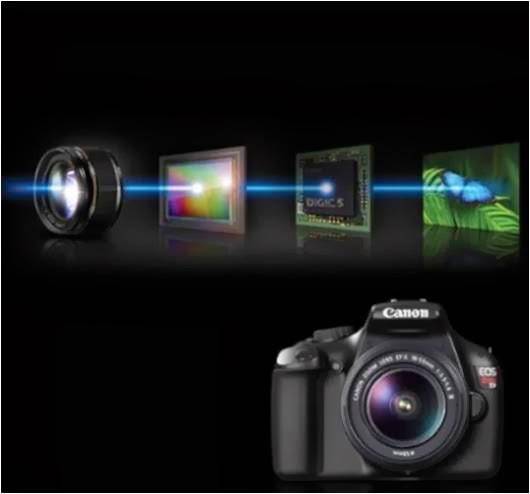
The
PowerShot A2500 makes highly advanced imaging technology fun and easy
to use, so you'll capture beautiful stills and video. The camera's 16.0
Megapixel sensor and DIGIC 4 Image Processor capture a wealth of detail
and natural color, so even your enlarged images have impressive
resolution. With the 5x Optical Zoom with 28mm Wide-Angle lens,
everything from close-up snaps to breathtaking landscapes is within your
reach. Smart AUTO recognizes 32 shooting situations and automatically
chooses the proper camera settings, and Digital IS keeps even dark
scenes and fast-moving subjects sharp and steady. Preserving memories in
rich, lifelike 720p HD video is as easy as pressing the dedicated movie
button, and Scene Modes like Fisheye Effect, Toy Camera Effect and
Monochrome give you new ways to shoot more creatively. Plus, you can
shoot longer with new ECO Mode, which reduces power consumption. A Help
Button makes the PowerShot A2500 perfect even for beginners, with
one-touch access to helpful instructions and advice.
High Resolution, Highly Advanced Performance
16.0 Megapixel sensor
With
the camera's 16.0 Megapixels of resolution, your images are rich and
clear, with textures and tiny details faithfully reproduced even at the
long end of the 5x Optical Zoom. This high level of resolution is ideal
for creating the largest prints, and allows you the flexibility to blow
up and crop any section of an image to express your creativity. The
DIGIC 4 Image Processor powers the camera's advanced systems and
features, ensuring fast, reliable performance with low battery
consumption.
DIGIC 4 Image Processor
Canon DIGIC Image
Processors have set the standard for functionality and performance since
their groundbreaking introduction in 1999. With each successive
generation, DIGIC processors have brought elevated performance and
powerful new features to PowerShot digital cameras. The DIGIC 4 Image
Processor has ushered in a new level of picture quality and accelerated
processing, making possible features such as high-speed continuous
shooting, HD video and Face Detection Self-timer.
Zoom in on Wider, Steadier Shots

5x Optical Zoom with 28mm Wide-Angle lens delivers stunning images
The
5x Optical Zoom (35mm equivalent: 28–140mm) in the PowerShot A2500
digital camera delivers outstanding optical performance and versatility.
It gives you a great range of potential images from a single location,
which is perfect for sporting events and other occasions when your
shooting stance is fixed, or times when moving in too close might
disrupt the action you're trying to capture. The lens' 28mm wide-angle
perspective puts more image in every frame for dynamic, exciting shots.
A Smarter Camera Means Better Photos
Smart AUTO
Photographers
of all levels appreciate a camera – especially a go-anywhere compact
digital – that takes the hassle out of capturing beautiful images. The
PowerShot A2500 gives you Smart AUTO – sophisticated Canon technology
that makes getting that great shot as simple as pressing the shutter
button. Smart AUTO automatically detects scenes by assessing various
factors in both the background and the subject. Detected scenes are
analyzed using 32 predefined shooting situations. The camera then makes
optimal settings to ensure the best possible image capture when shooting
still images. Smart AUTO also includes Advanced Subject Detection,
which allows the camera to detect and track non-human moving subjects
like animals and vehicles. With Smart AUTO, all you have to do is frame
your shot and capture away.
Shooting Modes/Special Scene Modes
| Smart AUTO | The camera automatically selects the best shooting settings for optimal quality based on subjects and environmental factors to provide point-and-shoot simplicity. |
|---|---|
| Program | The camera automatically and intelligently selects the aperture/shutter speed combination based on the shooting conditions. |
| Live View Control | Enables Brightness, Color, and Tone adjustments to your images using easy-to-understand controls. |
| Digital IS | The camera digitally corrects image blur by analyzing the subject prior to choosing the best correction method. |
| Portrait | Brings the subject into focus while beautifully blurring the background. |
| Face Self-timer | The camera waits for a face to enter the frame before releasing the shutter. |
| Low Light | For high quality image capture in an amazing range of dimly lit situations. |
| Fisheye Effect | Now you can get the fisheye effect – a classic photographic distortion – without a fisheye lens. |
| Miniature Effect | Give images a miniature look with an effect that emphasizes perspective by blurring the top and bottom of the image. |
| Toy Camera Effect | Simulates photos taken with "toy" or pinhole cameras, darkening the image at the edges to create a vignette effect. |
| Monochrome | Choose from three single-tone effects: Black-and-White, Sepia, or Blue. |
| Super Vivid | Super Vivid intensifies existing hues, saturating the scene with bright colors. |
| Poster Effect | Poster Effect combines several similar shades into one color, turning subtle gradations into eye-catching, scene-popping contrasts. |
| Snow | Shoot clear snow scenes without darkened subjects or an unnatural bluish tint. |
| Fireworks | Create brilliant images of skyrocketing fireworks. |
| Long Shutter | Use to blur moving subjects for artistic effect, ideal for urban night photography. |
| Movie | Record video; unwanted scenes can be deleted in playback mode. |
Gorgeous HD Video From Your Still Camera
Shoot brilliant 720p HD video
Using
the pocket-sized PowerShot A2500, you can shoot high definition video
anytime, anywhere. With a simple push of the dedicated movie button,
you'll be able to instantly record every moment in motion. 720p HD video
is smooth, vivid, and beautifully lifelike, making it an ideal way to
capture special memories. In addition to being able to shoot 720p HD
video at 25 frames per second, the PowerShot A2500 can also shoot 640 x
480 VGA video at 30* frames per second.
*Actual frame rate is 29.97 fps.
Dedicated movie button for easy video capture
It's
never been easier to shoot videos with a PowerShot digital camera. To
make shooting video as natural as snapping pictures, the PowerShot A2500
has a dedicated movie button. No need to plan ahead, no need to search
through menus on the LCD screen; when you feel a moment would be best
captured in 720p HD, simply press the button and recording begins. The
camera is always ready to shoot stills or video whenever you want.
Say Goodbye to Blur

Digital IS reduces the effect of camera shake and subject movement
Digital
IS beats the blur that mars many shots by recognizing the main subject,
then automatically applying the camera shake correction that best suits
the situation. If the subject is a person, blur reduction processing is
performed. For landscapes, cityscapes and other still scenes, the
camera takes three quick successive shots and composes them into a
single clear image. If the subject is moving, the camera takes three
successive shots, then automatically saves the clearest image.
A Charge that Lasts as Long as a Memory
New ECO Mode helps reduce power consumption for longer battery life
The
PowerShot A2500 takes energy conservation to the next level with ECO
Mode, which provides more shots per single charge through LCD monitor
and camera power management. ECO Mode can be activated via a dedicated
button for easy power preservation when an outlet is unavailable or the
moment is too exciting to put the camera down. ECO Mode quickly wakes
the camera from sleep when a button is pressed so you won't miss the
moment. When the fun with family and friends runs late into the evening,
ECO Mode on the PowerShot A2500 makes sure your camera keeps up.
More Ways to Get Creative
Scene Modes
Scene
Modes are fun, easy ways to give your shots a distinctly artistic feel
without the need for any extra lenses and filters. Super Vivid heightens
and saturates colors for eye-popping intensity. Poster Effect
eliminates gradations between colors for an illustrative feel. Miniature
Effect enhances perspective in a scene, blurring the top and bottom to
make it look as if it were created with miniature models. You can also
make a quirky portrait using the Fisheye Effect or add a beautiful
single-tone effect with Monochrome. Toy Camera Effect simulates a
vintage look as it capturing the photo using a "toy" or pinhole camera.
Help You Won't Need Help to Find
Help Button
The
PowerShot A2500 digital camera is designed to be fun and easy to use,
even for beginners. A Help Button on the camera's exterior brings up the
help menu any time you need it, right on the LCD screen. From here, you
can scroll through a variety of topics that answer your questions with
clear explanations, offer helpful shooting advice, and show you diagrams
highlighting the position of any buttons you'll need.
Well, I think enough for this one. How? are you interested? If you want to buy or need more information about this camera, just click here. Have a nice day :)


 If it’s a point-and-shoot camera, there’s even a greater chance of dust or fingerprints on the lens because when you turn the camera off, the lens usually slips behind little louver blades that A) protect the lens, and B) hide the fact there’s dust or a fingerprint on the lens.